Hi everyone! Getting used to using my husband's pc whilst mine is still in Pooter Hospital under the care of Dr Chris ... I can't print anything and he doesn't have Microsoft Office, but he does have Picasa, which apparently is a freebie and I'm getting to like it so much I may have to get it myself...
Anyway, this week is Case File#36 over at CSI - here it is
 As you can see, Debbi has added a new dimension to the challenge for this month - as well as using all five colours in The Scheme, at least two pieces of Evidence and one item of Testimony, we also have a sketch to follow in order to solve the case. CSI has joined forces with Once Upon A Sketch, so each week we'll get a new sketch as well as the usual colour prompts and ideas and the fab CSI Coordinates which are free printable words, images and backgrounds.
To be honest, I wasn't totally looking forward to working with these colours, but once I got going I really enjoyed myself - here is the result of my endeavours
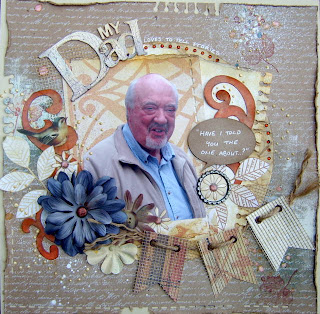 I used all the colours in The Scheme and added accents of grey-blue (you're allowed up to 10% of an accent colour and any neutrals)
My Evidence: magic mesh in the background and layered on the banner; leaves cut from the CSI Coordinates and stamped on the background; misting; curved organic shapes cut from paper lace and accented with liquid pearls.
Here are a couple of close-ups
 You can see here the banner which I made with scraps of patterned paper layered with Magic Mesh, adding eyelets to thread the string through. There is also one of my favourite home made embellishments - a bottle top squished in the Cuttlebug and decorated with a 1" circle and a flower sticker.
 The little bird was cut from a scrap of pp and he's perched on a piece of the Paper Lace (which was originally a yukky peach colour but I've inked it and added Glimmer Mist). The title alphas were plain chipboard which I've painted dark brown, then added crackle medium followed by a coat of pale cream paint, and finally used Distress Ink to accentuate it further. The "torn notebook" effect on the edge wasn't done with a border punch as I don't have one - I used my Crop-a-Dile to punch a line of holes and then tore them away with my old friend Pokey Tool. The running stitch effect is done with a border punch though - I only bought it last week and I've used it on every layout since! I always do that with new things (I'll be able to look back and say, " aah yes, that was when I had just got my new border punch/Crop-a-Dile/Dymo machine ...)
Ok well that's it then - off to CSI now to upload my page and see what everyone else has been up to :)
Anyway, this week is Case File#36 over at CSI - here it is

To be honest, I wasn't totally looking forward to working with these colours, but once I got going I really enjoyed myself - here is the result of my endeavours

My Evidence: magic mesh in the background and layered on the banner; leaves cut from the CSI Coordinates and stamped on the background; misting; curved organic shapes cut from paper lace and accented with liquid pearls.
Here are a couple of close-ups


Ok well that's it then - off to CSI now to upload my page and see what everyone else has been up to :)
Comments